Views and checking results
The view modes and overlays show at a glance whether an unwrap is good: stretch, texel density, seams, flipped faces. The Result tab puts numbers on it and lists the islands worth a second look.
View modes
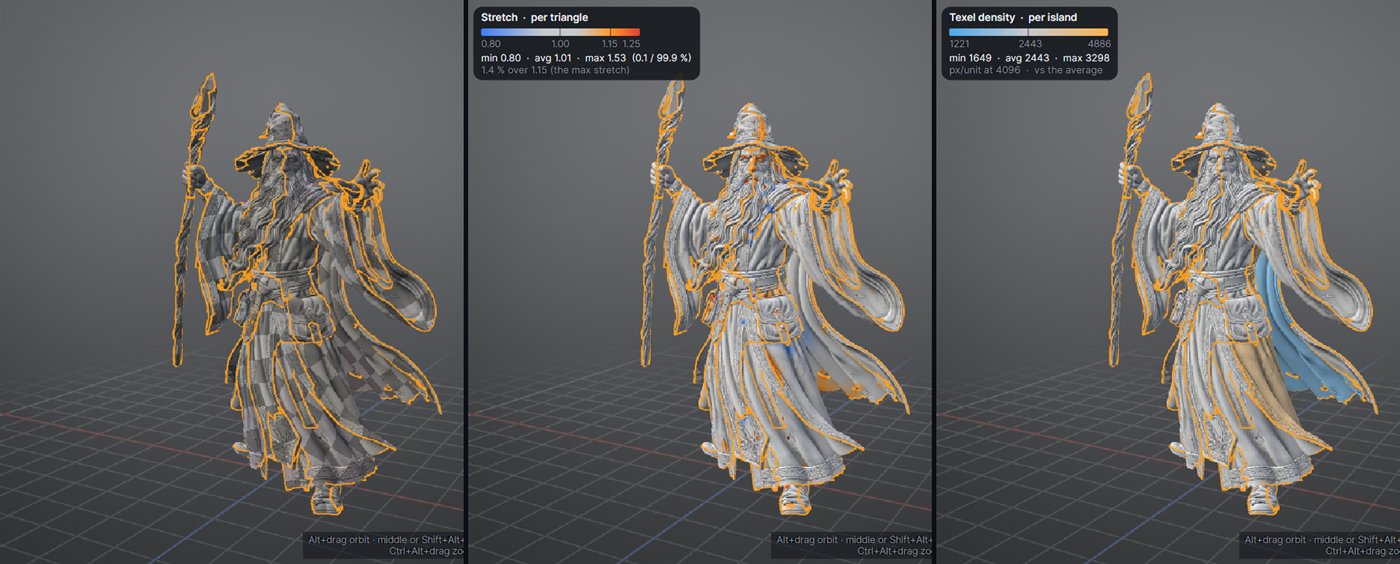
The 3D view's title row has one icon per mode; the keys are Alt+1 to Alt+6. Every mesh opens in Shaded.
| Key | Mode | Shows |
|---|---|---|
| Alt+1 | Shaded | A neutral mid-grey clay, like a sculpting material preview. |
| Alt+2 | Checker | A checker texture through the UVs: squares should stay square and even in size. The cell size is in View ▾ > Checker cells. |
| Alt+3 | Islands | A colour per island. |
| Alt+4 | Stretch | Each triangle by its stretch: blue = compressed, grey = right, orange up to the max stretch, soft red past it. A good unwrap reads calm grey; only real problems pop. |
| Alt+5 | Normal map | After a bake: the low-poly lit with the baked map. Press again to compare with and without the map. |
| Alt+6 | Density | Each island by its texel density against the target (or the layout's average): blue below, grey on it, amber above. |
Stretch and Density show a small legend in the 3D view's top left corner with the scale and the min / average / max values.
On a sculpt the per-triangle stretch looks speckled: micro detail tilts single triangles. Judge the islands by their overall colour, or by the numbers in the Result.
Overlays
| Overlay | Key | Shows |
|---|---|---|
| Seams ▾ | S | The seam lines in the view under the mouse. Its ▾ picks the kinds: automatic seams (orange), cuts by hand (cyan, Shift+S), open borders (white). On at every start. |
| Wire | F1 | The wireframe. The UV view has its own Wire button, which fades out when zoomed far out. |
| X-ray | X, F2 | Seams, selection and wire also behind the model, faint. |
| Faces | Alt+O, F3 | Face orientation: front faces blue, back faces red. |
| Cavity | Alt+K, F4 | Brightens ridges and darkens valleys, so fine sculpted detail reads at any zoom. |
Back faces (a triangle seen from behind: flipped parts, the inside of open borders) are always tinted magenta and darker, in every mode.
The UV view
The UV view draws every island in one flat clay grey, so cuts, seams and the selection read clearly. It also shows:
- Not-flat islands in a darker striped slate, locked islands in a darker solid clay with a padlock.
- Flipped triangles in red.
- The UDIM grid with the UDIM numbers.
Its title row has Wire, Seams ▾, Overlaps (overlapping triangles) and the Show list: UV layout, Normal map, Displacement, Stretch, Checker and Density. The bottom-left corner names the island under the mouse.
Background and up axis
View ▾ on the 3D title row sets the background for both views:
- Clay grey (the default): one flat cool grey, the same in both views.
- Gradient: dark slate to near black; the silhouette stands out.
- Studio grey: neutral, to judge colours and normal maps.
- Light: dark seams and wire read best.
- Plain dark.
The up axis (View ▾ > Up axis, Alt+Z flips Y / Z) is Auto by default: it guesses Y or Z up when a mesh opens, and the status line says which ("Up: Z (auto)"). You can force Y up or Z up. It only turns the view; the mesh, the UVs and every export keep the file's exact coordinates. Your choice is remembered; a project keeps its own.
Navigation
The mouse works the same way in both views.
| Mouse | 3D view | UV view |
|---|---|---|
| Alt + left drag | orbit | pan |
| Middle drag (with or without Alt) | pan | pan |
| Alt + right drag | zoom toward the point under the press | zoom |
| Wheel | zoom toward the surface point under the mouse | zoom at the mouse |
| Double click | frame the island | on the background: fit |
A plain left click or drag always selects and never moves the view. A plain right drag does nothing.
With a pen tablet
No wheel and often no middle button? Shift+Alt + left drag pans and Ctrl+Alt + left drag zooms (right or up zooms in), in both views. + / - zoom the UV view. The radial menu on Z gives the main tools without the keyboard.
Framing
| Key | What it does |
|---|---|
| F | Frame the selection (or what shows). |
| A, Home | Frame the model; fit the UV view. |
| Alt+F | Centre on the island under the mouse (the selection stays). |
| E | The view under the mouse alone; again for both. |
| Ctrl+E | Swap the 3D and UV views. |
Both title rows also have a Frame button.
The Result tab
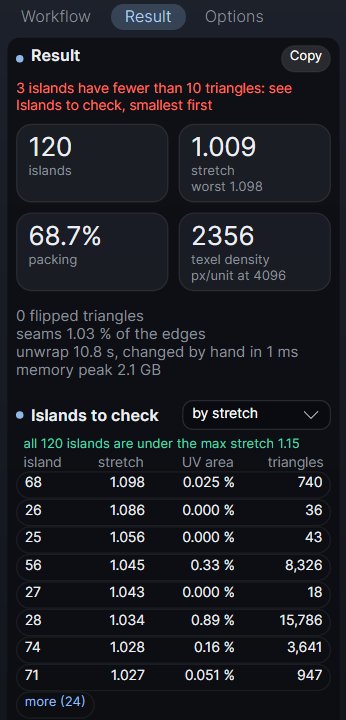
The Result tab sums up the current layout: islands, flipped triangles, % packing (and each UDIM's share), average and worst stretch, texel density in pixels per unit, and after a bake the displacement range. What needs a look is in red: stretch above the max, flips, rays that missed in a bake. The previous run on the same mesh is shown beside it for comparison.
Copy (Ctrl+C) copies the Result as text.
Islands to check
Below the numbers, Islands to check lists the islands to look at first, sorted by stretch or smallest first (slivers and fragments that add seams for nothing and are hard to paint). Click one, or press N / Shift+N to step through them: the island is picked, framed in 3D and highlighted in the UV view.
The island card
When an island is picked, a card in the 3D view's bottom-left corner shows its full numbers, such as its stretch, texel density and UDIM, and a small card at the UV view's top right names it.