The interface
One window, two views side by side and a side panel that follows the order of the work. Nothing floats over the pictures: the tools sit on docked bars, so the views never move.
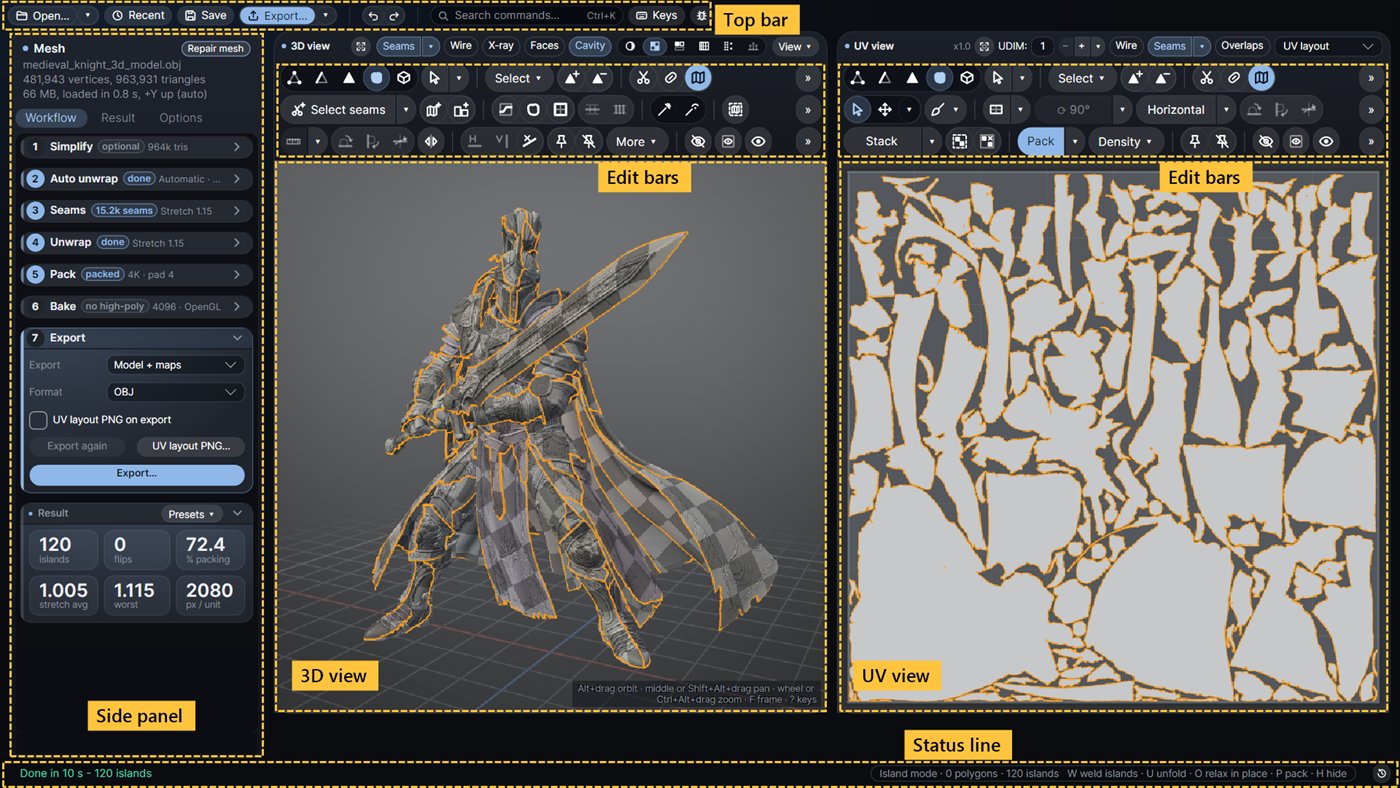
The top bar
The top bar keeps the global things:
- Open and its ▾ menu: Open mesh or project…, recent files, Save, Save as…, Quick export <name>_UV, UVs from a file of this mesh… and Load high-poly for bake….
- Save and Export.
- Undo and Redo: one history for both views.
- Search commands… Ctrl+K: the command search (below).
- Keys: the keyboard and mouse map (also ?).
- Report bug: the beetle icon. See Troubleshooting.
When a new version is out, an Update pill shows at the right end of the bar.
The 3D view and the UV view
The 3D view (left) shows the model; the UV view (right) shows the layout in the UV square or the UDIMs. Both select the same things: a polygon picked in one lights up in the other, and the edge under the mouse in 3D shows in 2D too.
Each view has a title row with its display options:
- 3D: the view modes (Shaded, Checker, Islands, Stretch, Density, Normal map), the overlays Seams ▾, Wire, X-ray, Faces, Cavity, the View ▾ menu (background, up axis, checker cells) and Frame.
- UV: Wire, Seams ▾, Overlaps, the Show list (UV layout, Normal map, Displacement, Stretch, Checker, Density), the UDIM stepper and Frame.
E shows the view under the mouse alone (press again for both). Ctrl+E swaps the two views for the session. More in Views and checking results.
The edit bars
Under each view's title row is its edit bar, in two rows.
Row 1: shared by both views
The selection modes (Vertex, Edge, Polygon, Island, Element), the selection tool (Click, Box, Lasso, Polyline), Select ▾, Grow / Shrink, Cut, Weld, U, Hide / Isolate / Show all, Pin / Unpin and More ▾. You never need the 3D bar to work in 2D, or the other way round.
Row 2: the view's own tools
- 3D: Select seams ▾, the edge selections (sharp edges, polygroup borders, current seams), the planar and curved magic wands, Cut + unfold, Straighten ▾, align edge, Symmetry, Loop and Ring.
- UV: the Select / Transform tools and Brushes, Rectangularize ▾, Island ▾, Align ▾, Stack ▾, Pack ▾, Density ▾ and Lock.
Tools whose icon says it all show only the icon; hover them to read the name and key. Split buttons such as Straighten ▾ or Align ▾ remember the last command you ran from their menu: a click on the label runs it again, the ▾ picks another.
A tool that does not apply right now is greyed, never hidden. When a view is too narrow, the less used tools fold into the row's » menu.
The side panel
At the top, the Mesh panel shows the loaded mesh (triangles, polygons, polygroups, the up axis) and the Repair mesh button. Below it are three tabs:
| Tab | What it holds |
|---|---|
| Workflow | The steps in the order of the work, each a card you open and close: Simplify, Seams, Unwrap, Pack, Bake, Auto unwrap, Export. At the bottom, the Result card with the key numbers and Presets ▾. See Workflow overview. |
| Result | The numbers of the current layout, the warnings and Islands to check. See Views and checking results. |
| Options | The tools' options and your preferences. See Options and settings. |
The panel's footer has the support e-mail (click to write, or copy it) and the Discord link.
The status line
The bar at the bottom shows the selection mode, what is selected, the number of islands (and how many are not flat yet) and the next keys that make sense in this mode, such as "C cut · W weld · dbl-click loop" in Edge mode. After every action it says what was done.
Long messages are cut with "…". Click the status line, the history button at its right end, or press Ctrl+L to read the last 30 messages in full (warnings in orange, errors in red). You can select and copy the text, or use Copy all.
While a job runs, a progress bar and Cancel show there; the progress also shows on the Windows taskbar button.
Command search (Ctrl+K)
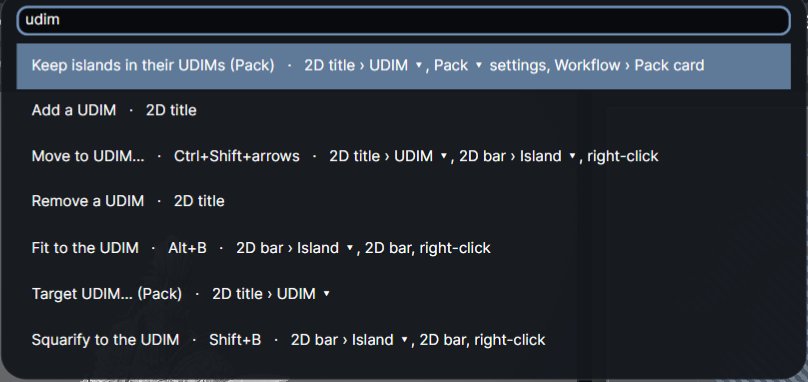
Ctrl+K opens a search over every command. Type a few letters of a name, a key or a related word ("grid", "stitch", "relax", "layout", "udim"): the list shows each command with its key and where it lives in the interface. Enter runs it.
A greyed command run from Ctrl+K, a menu or its key does not silently do nothing: the status line says why it cannot run.
Tooltips and greyed buttons
Every tooltip reads in two levels: the first line says what the control does and its key; the details follow below in a dimmer colour. A greyed button, menu item or option still shows its tooltip, with an orange Greyed: line that says why, for example "open a mesh first", "Edge mode only - press 2" or "needs a high-poly - Load high-poly…".
Right-click menu and radial menu
A right click in either view opens the current mode's tools at the mouse, with their keys.
For pen users there is the radial menu: hold Z over a view and eight slices open round the pointer, with the selection modes Edge, Polygon, Island and Element across the top and Cut, Weld, Unfold and Pack along the bottom. Move toward a slice and let go of Z to run it. Let go in the centre, or press Esc, to do nothing. A quick tap of Z leaves the menu open so you can click a slice. You can turn it off in Options > Interface.
Your own bars
The four bar rows (3D rows 1 and 2, UV rows 1 and 2) can be changed:
- Right click a bar button (greyed ones too): Remove from bar, Move left, Move right, Customize bar…, Restore default bar.
- Right click a menu item or a Ctrl+K row: Add to bar.
- Customize bar… opens a card: pick a row, reorder its tools with ↑ / ↓, remove with ✕, add separators, and add any command from the searchable list on the right. Restore this row and Restore all bars undo your changes.
Your bars are remembered. Tools you add fold first when a row is full, so the default tools keep their place.
Screen size
The window is designed for 1920 x 1080 at 100 % or 125 % Windows scaling and works down to 1366 x 768. On smaller screens the bars fold their rarer tools into », the 3D title row folds its overlays into View ▾, and the Workflow tab closes other cards to make room. Settings and About… > Interface also has a UI density setting (Compact or Comfortable), see Options.