Selection
Every tool in Atlasmith acts on the selection, or on what is under the mouse when nothing is selected. The selection is shared by the 3D view and the UV view and is always available: there is no separate edit mode.
Selection modes
The keys 1 to 5 pick the mode, as in 3ds Max (number row or numpad). F1–F4 are not modes: they switch the view overlays (Wire, X-ray, Faces, Cavity). The mode buttons are the first buttons of both edit bars.
| Key | Mode | A click selects | A double click |
|---|---|---|---|
| 1 | Vertex | a vertex | the vertices of the piece up to the seams |
| 2 | Edge | an edge | the edge loop |
| 3 | Polygon | a polygon (quads stay whole) | the piece up to the seams round it |
| 4 | Island | the island under the mouse (shown in white before the click) | selects and frames it |
| 5 | Element | a connected part of the mesh | the whole part |
Island is the mode at every start. A project keeps its own mode.
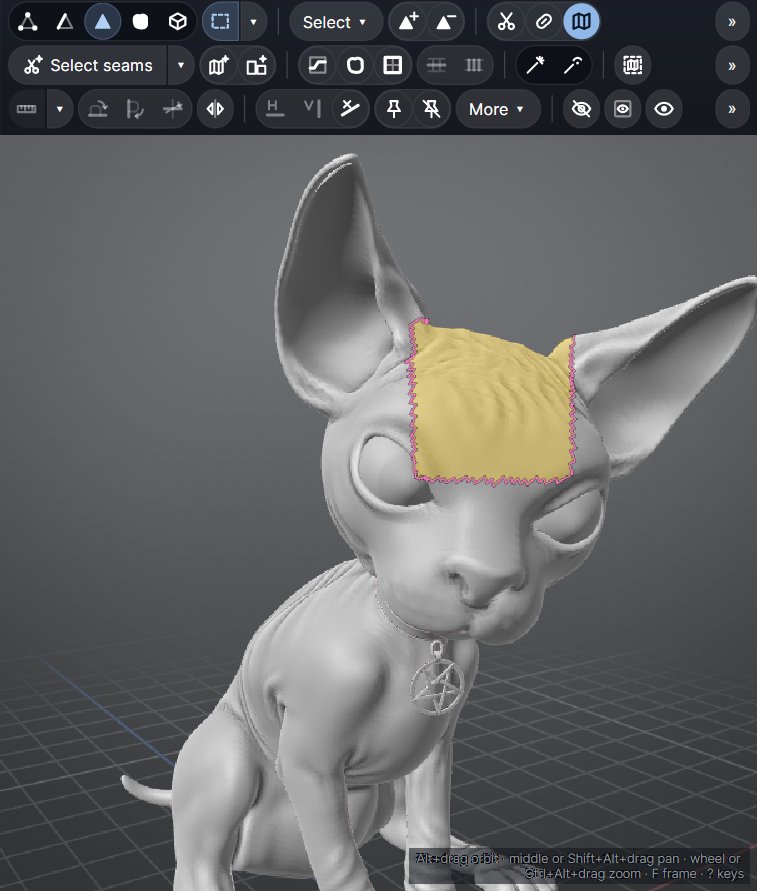
In every mode: Ctrl+click adds, Ctrl+Shift+click removes, and a click on the background, Backspace or Esc clears. Selected polygons show tinted yellow, vertices as yellow dots, edges in pink.
Right after a mesh opens, the selection tools are prepared in the background. Until they are ready the keys say "preparing" and do nothing else.
Click, Box, Lasso and Polyline
The split button next to the modes picks the selection tool. A click on it switches between Click and the last marquee tool; its ▾ picks one.
- Click (the default): click to select. A left drag in the UV view still draws a box.
- Box and Lasso: a left drag draws the shape and selects in the current mode. Ctrl adds, Ctrl+Shift removes.
- Polyline: in the UV view each click adds a corner, a double click closes it, a right click takes one back. The 3D view draws it as a lasso.
A plain left drag never moves the view; Alt + left drag still orbits.
Window or Crossing
How a box or lasso takes things is set in Select ▾ on either bar (one setting for both views):
- Crossing (the default, dashed outline): takes whatever touches the shape.
- Window (solid outline): only what is entirely inside.
- By drag direction: left to right is a Window, right to left a Crossing; a lasso drawn clockwise is a Window. The outline shows which one applies while you drag.
| Mode | Crossing takes it when | Window takes it when |
|---|---|---|
| Vertex | the vertex is inside | the same |
| Edge | any part of the edge is inside | both ends are inside |
| Polygon | any part of the polygon is inside | all its corners are inside |
| Island, Element | any part of it is inside | every polygon that shows is inside |
Back faces
In 3D a box or lasso takes everything in the shape by default, front and back, seen or hidden behind something, as if the model were see-through. Turn on Box: ignore back faces (Select ▾, Ctrl+K or the Options tab) to take only what the camera sees. This setting is remembered.
In the UV view
The UV view shares the selection. In the polygon modes a click on an island selects its polygon, island or element, and a drag draws a box with the same rules. In Edge and Vertex mode a click selects the nearest edge or vertex. Shift paths, double clicks and box / lasso work in 2D as in 3D.
With the Click tool, Ctrl + drag in the UV view moves islands instead of adding to the selection; see 2D editing.
Converting the selection
A plain click on a mode button (or its key) just switches the mode. To convert the selection, as in 3ds Max:
| How | What you get |
|---|---|
| Ctrl+click a mode, or Ctrl+1–5 | Everything the selection touches. An edge loop as Polygon takes the faces on both sides; anything as Island takes the islands it is on. |
| Ctrl+Alt+click, or Ctrl+Alt+1–5 | Only what it holds whole. Edges as Polygon take the faces whose edges are all selected. |
| Shift+click, or Shift+1–3 | Its border, as vertices, edges or the ring of border polygons. |
Select menu, grow and shrink
| Key | Command |
|---|---|
| Ctrl+A | Select all |
| Ctrl+I | Invert |
| Ctrl+B | Island borders, as edges |
| Shift+2 | Border edges of the polygon selection |
| Num + / Num - | Grow / shrink, in every mode |
| Alt+X | Edge loops of the selected edges |
| Shift+X | Edge rings (the parallel edges) |
| Backspace, Esc | Clear |
Grow adds every neighbour: in the polygon modes each polygon sharing a corner with the selection, in Edge mode each edge sharing a vertex, in Vertex mode the vertices one edge away. Shrink takes the outer ring off again, so a Shrink undoes a Grow. Hidden parts never join.
Select ▾ on either bar holds these, plus the current seams and the Window / Crossing choice.
Edge loops, rings and paths
A double click in Edge mode selects the edge loop: straight on through quad vertices, the straightest way on triangles, stopping at poles, borders and seams. Shift + hover previews the shortest path from the end of your chain, and Shift+click adds it.
The Options tab, section Edge loop, path, sharp, symmetry, tunes them:
| Option | What it does |
|---|---|
| Path straightness | 0 is the plain shortest way; toward 1, the straightest run of edges toward the target, with no zigzag across a triangulated sculpt. |
| Paths follow sharp edges | Paths bend toward creases and sharp edges instead of the plain shortest way, so seams hide in the folds. |
| Limit angle + Loop max angle (deg) | A loop stops where the next edge turns more than the angle. |
| Limit count + Loop max count | A loop takes at most that many edges on each side of the click. |
| Geometric | Loops follow the straightest way on any mesh, through poles and n-gons too. |
| Stop at selection | A loop stops where it meets an edge you selected before: draw loops up to a cut. |
| Sharp angle (deg) | The angle used by the Sharp edge selection. |
Magic wand
The wands select a region of polygons with one click: a flat panel, a limb, a plate. They work in Polygon mode, and show what they will take before you click. They are on the 3D bar.
| Wand | Takes | Change the angle |
|---|---|---|
| Planar | the polygons reached while their normal stays within the Planar angle of the clicked polygon | Shift + wheel |
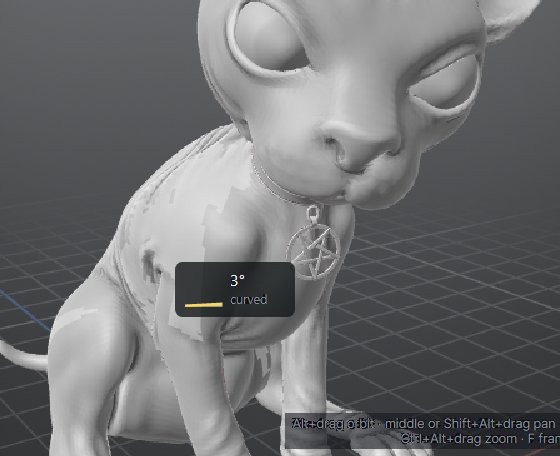
| Curved | the polygons reached while neighbouring faces bend less than the Curved angle, up to the creases | Alt + wheel |
Without a wheel (a pen tablet), [ and ] change the angle of the active wand by 2°, Shift+[ / Shift+] by 10°. A small gizmo next to the pointer shows the angle.
More in Options > Magic wand:
- Wand smoothing / Smooth out: smooth the face normals first, for clean regions on a noisy sculpt or scan.
- Fill gaps (polygons): small unselected groups inside a region are taken too.
- Wand across seams: off, a region stops at seams, inside its island.
- Local angle view (purple): draws the edges over the curved angle.
- Wand gizmo at the pointer.
Wand a region, then Cut + unfold: it cuts around the selection and unfolds it in one go. One Ctrl+Z puts it all back.
Selection tools by island
These pick islands by what they are; they live in the UV bar's Stack ▾ menu:
- Select similar (Alt+C): islands like the selected ones (same triangle count, nearly the same 3D area).
- Select overlapping (Alt+L): islands that overlap another island.
- Select flipped: polygons mirrored in UV.
- Select small islands: every island with fewer triangles than Islands under (triangles) (Options > Island filter), slivers you may want to weld.