3 · Seams
Seams decide where the surface is cut open. Place them by hand with a few keys, or let Select seams propose them, look, adjust, and cut.
How seams work
In Atlasmith the mesh and its seams are the document. Each region between seams is one island. An open border of the mesh also counts as a seam, so a shell, a plane or a sculpt with holes can be unfolded right away; only a closed part (a sphere, a closed head) needs a cut first.
- C cuts: the selected edges become seams (cyan lines). The pieces keep their UVs; nothing moves in 2D until you unfold.
- W welds: the edges become ordinary inner edges again. The joined island is "not flat" until you unfold it.
- U then unfolds the islands, see Unwrap.
A cut that does not close a loop is a slit inside its island: useful to relieve tension in a cone or a long tube.
Cutting by hand
- Press 2 for Edge mode. The edge under the mouse lights up.
- Click an edge to select it, Ctrl+click to add, Ctrl+Shift+click to remove. A double click takes the whole edge loop.
- For a seam across the surface, hold Shift and hover: the shortest path from the end of your chain to the edge under the mouse shows in lime. Shift+click adds it. Hop from point to point to draw the seam.
- Press C to cut.
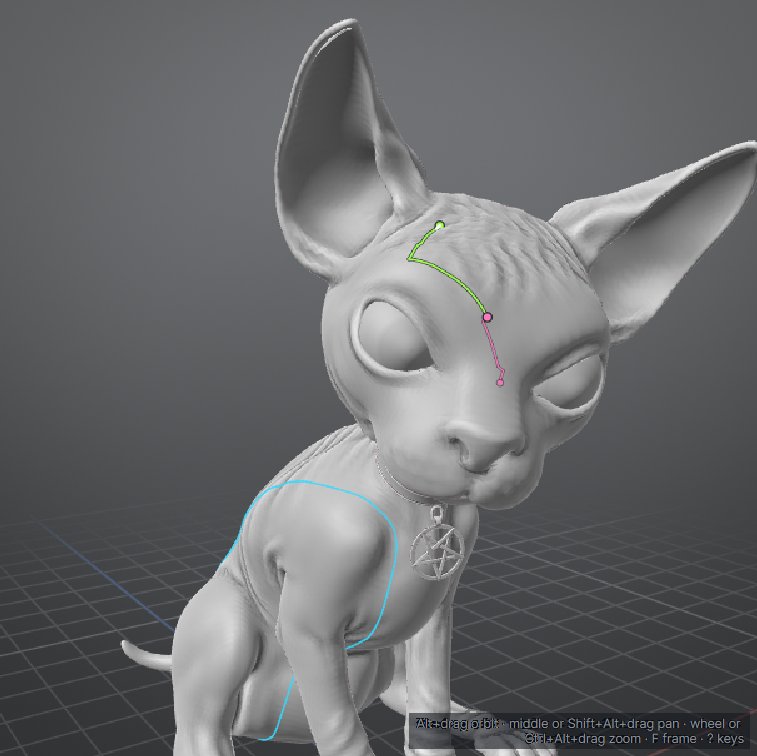
Before you cut, the cut preview shows what C will do: the selection in hot pink, round dots at the open ends of a chain, and the piece a closed loop would split off its island tinted soft pink.
Other ways to select a seam
- Polygon mode (3): select polygons and C cuts around them, making them one island. The magic wand is great for this: one click takes a flat panel or a limb.
- Vertex mode (1): C cuts the edges between the selected vertices.
- Nothing selected: C cuts the edge under the mouse.
- V / B set what a plain click does in Edge mode: V adds the shortest path from the last edge (like Shift+click), B selects the edge and a double click its loop (the default).
- The 3D bar's edge selections: Sharp (edges sharper than the Sharp angle), Polygroups (polygroup borders) and Seams (the current seams).
Path and loop options (path straightness, loop limits) are in the Options tab, see Edge loops, rings and paths.
Welding
| Key | What it welds |
|---|---|
| W | Edge mode: the selected edges (nothing selected: the whole seam under the mouse). Island or Polygon mode: welds islands, the selected ones where they meet, or one selected island to every island it touches (an island split by mistake: select it, W). |
| W right after C | Puts that cut back exactly as it was, in any mode. |
| Shift+W | Only the cuts inside the selected (or hovered) island: its slits. |
| Ctrl+W | Only the cuts between two islands. |
| Ctrl+A, W | Weld every seam: clears the mapping and starts over. |
Locked and hidden islands are never welded; the status says so. Open mesh borders always stay.
Magnet weld welds the cut edges whose two sides lie close together in the layout (within Magnet weld (px) texels): the shut end of a slit, or islands you moved edge to edge. It works on the edge selection, or on every cut when nothing is selected.
Symmetry
Symmetry (Alt+S, on the 3D bar) makes every selection take its mirror image too, so every cut and weld is done on both sides. Pick the axis or leave it on Auto. A sculpt that is not vertex-exact symmetric still works: the nearest vertices stand in.
Select seams
Select seams proposes seams for what is shown and leaves them selected as edges, in Edge mode. Nothing is cut yet: look at the proposal, add or remove edges, then press C to cut and U to unfold.
It works on the selected islands, or on every visible island when nothing is selected. Hidden parts are never touched, so you can isolate a part (I) and give it its own treatment.
Find it in the Seams card of the Workflow tab, or on the 3D bar: Select seams ▾ (the ▾ opens the same options).
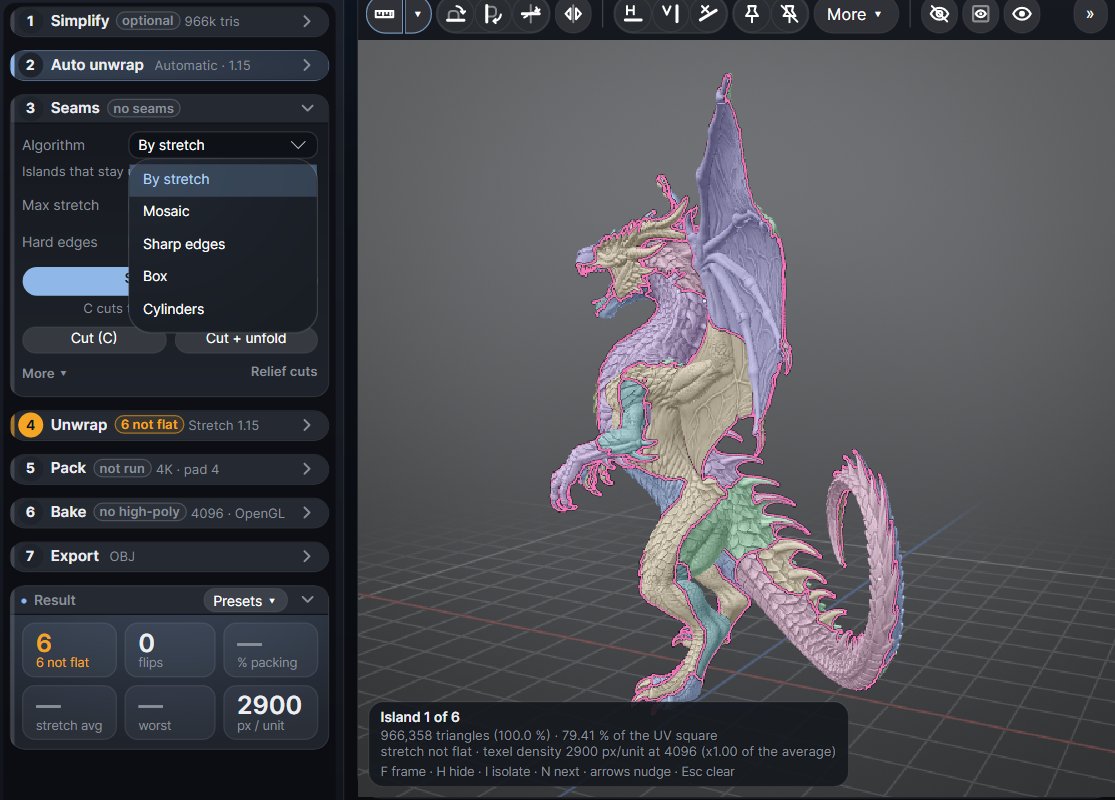
The algorithms
| Algorithm | What it does | Use it for |
|---|---|---|
| By stretch | Islands that stay under the max stretch (the same value as Unwrap). It looks twice at every region it would split, and keeps a ring or a curved wall as one island with one clean seam when that unfolds well. | Sculpts and scans: the general choice. |
| Mosaic | About the number of islands you ask for (Mosaic islands, default 50), each one clean. | When you want a fixed, small number of islands. |
| Sharp edges | Seams where faces meet at more than the Sharp angle (default 60°). | Hard-surface models. |
| Box | Faces grouped by the side they face (six directions), after smoothing the normals (Box smoothing, default 8). Small pieces join a neighbour, so a noisy sculpt gives a few big islands. | Blocky shapes, architecture, quick projections. |
| Cylinders | Caps at the sharp angle, then one seam along each tube or ring, from one open end to the other. | Pipes, limbs, cables, rings. |
For By stretch and Mosaic two more options steer the seams:
- Polygroups: every border between two polygroups becomes a seam, and the algorithm only adds cuts inside a group. ZBrush polygroups come in as OBJ groups (export with Grp on).
- Hard edges (degrees): every crease sharper than the angle becomes a seam. Good for hard-surface models and their normal-map bakes; keep it at 0 on organic sculpts.
Select, Flatten or Pack
| Button | What it does |
|---|---|
| Select seams | Only selects the seams. You decide what to cut. |
| Cut (C) | Cuts the current selection. |
| Cut + unfold | Cuts and unfolds in one step. |
| Flatten | Select seams, cut and unfold. |
| Auto unwrap selection | Select seams, cut, unfold and pack the selected islands. |
To do all of it on the whole mesh at once, use Auto unwrap.
More seam options
The Seams card's More ▾ holds the less used options:
- Select existing: Sharp edges, Polygroups or the current Seams as an edge selection.
- Seams file: Save… and Load… keep your seams in a small text file, to use them again on the same mesh.
- 2D pairs: faint lines from each side of a seam to its other side in the UV view, for the selected islands.
- Keep seams on Auto unwrap: Auto unwrap keeps your seams and only adds cuts where an island cannot unfold well.
- Move cut pieces apart after U (off by default): after U, the pieces of a cut that overlap move to the nearest free spot.
- Magnet weld and its distance.
The same options are in the 3D bar's Select seams ▾ card; Options > Seams links to it.
Seam colours
| Colour | Meaning |
|---|---|
| Cyan | Your cuts by hand (and Select seams' cuts). Thin and slightly see-through. |
| Orange | Seams made by an automatic unwrap. |
| White | Open borders of the mesh. |
| Hot pink | The cut preview: what C will cut. |
| Lime | The Shift path preview. |
S shows or hides all seam lines in the view under the mouse, Shift+S only your cuts. The Seams ▾ chip on each view's title row picks which kinds show.